Ruddle "SINE" Technique Card
Mar 2009
If you could have any superpower, what would it be? Ruddle & Lisette reveal their power choices in the show’s Opener. Then, Dr. Arnaldo Castellucci gives a presentation on access refinement using some innovative ultrasonic tips, before moving on to working length and a lesson on apex locators. After, Ruddle and Lisette share insights in a post-presentation discussion. Then, to close the show, Ruddle is at the Board presenting a case report on fiber post removal and reminding us of a cost-effective & efficient technique.
There is an old expression... “Start with the end in mind.” Before initiating the access preparation, think, visualize, and plan to more effectively execute a predictably successful result...

Endodontic performance is enhanced when clinicians thoughtfully view different horizontally-angulated, pre-operative radiographic images, visualize minimally invasive, yet complete, treatment, then use this mental picture to guide each procedural step...
This transcript is made available by The Ruddle Show in an effort to share opinions and information, and as an added service. Since all show text has been transcribed by a third party, grammatical errors and/or misspellings may occur. As such, we encourage you to listen/watch the show whenever possible and use the transcript for your own general, personal information. Any reproduction of show content (visual, audio or written) is strictly forbidden.
…That’s the critical thinking that I like about Arnaldo, and Pierre, and John West, and Schilder. Can I stop?
Yes, because you’re going to need to name everybody you know…
Welcome to The Ruddle Show. I’m Lisette and this is my dad, Cliff Ruddle.
How you doing?
I’m pretty good, how about you?
Great! And out there I hope you’re doing better than she’s doing. She’s doing already at the top; we want you better. Welcome to 106.
Okay, we have a fun topic that we’re going to start off with. For over 100 years now we have had the idea in our society of a superhero, with the first superhero comics appearing in the early 1900s. Abilities have ranged from super strength, invisibility, teleportation, time travel, breathing under water; there’s endless possibilities. And probably most of us at some point in our life some of us have wished we had a superpower. So I was asking you, if you could have a superpower, what superpower would you want? And you immediately said flying, but then you kind of backed off of that a little bit and hesitated to embrace it.
Then in subsequent conversations it came up again. I said what would you want to be your preferred superpower? And you said well, I think I would want to do beautiful endodontic cases. And then I thought well, that’s something you already kind of did so it’s not really a superpower. And then what else? And you said well, maybe I would like to be able to hit a home run whenever I wanted. And again, I don’t know how that helps you now.
So after having thought about it some more, what would you now choose as your preferred superpower?
If I have a superpower and I’m 77, I can’t hit a home run?
Yeah, you just – I just don’t know where you’re going to use it.
Well it dawned on me because of 3.2 million lecture-related travel miles, and those thousands and thousands of hours out in the field, I started thinking it would be teleportation. Teleportation because I could be and see Pierre Machtou just like that. Just think it and I’m there. I’ve got to go on the Inside Passage in Canada to be with John West on the Falcon – that’s his boat – just like that.
So I though geez, I could be anywhere in the world. I could drop into Wimbledon, I could drop to see friends, I could drop in maybe to hit a home run with two outs on the bottom of the 9th at Yankee Stadium. But anyway, that’s kind of what I would like.
Then I started thinking, well just teleportation is a little bit limiting. So I did think about invulnerability. Because when you have invulnerability and you’re not vulnerable, guess what? You have immense powers to do what? Mental, physical and spiritual good things, and so I thought well that’s interesting.
Okay. Well that is interesting. The teleportation was originally the one that I was going to choose, but you were kind of having trouble, so I let you choose that one.
Okay.
Then I thought what I would want. I was thinking maybe Jedi powers, like in Star Wars, because Jedi’s actually can do many things. That’s kind of cheating, but I though that’s one way I can choose one thing and then maybe have lots of powers. Jedi’s can control minds, they have enhanced physical abilities and senses, they can move objects, they have healing abilities, they can glimpse the past and the future, they can manipulate energy, and so they use The Force.
May The Force be with you! Okay.
Well I think whether we choose this one or that one from the superhero era – and guess it’s still going. I don’t ever actually watch this stuff. But we have to remember to do good, not evil, and we must do a good so we can do the good, the truth and the justice. So maybe a little bit like for dentistry, the Hippocratic Oath.
And that brings us back to dentistry and endodontics, and we have a guest speaker today which we will see momentarily from Florence, Italy. So let’s get on with the show and may The Force be with us!
Okay, so today we have a guest presentation; we’re going to watch it in a moment. It is by Dr. Arnaldo Castellucci, who is an endodontist from Florence, Italy. He is very passionate about endodontics, and his international contribution to endodontics is multifaceted. He’s a professor, a lecturer, an author, inventor, and also a clinician. So you might remember him from our 100th Ruddle Show Legacy Special, because he was on that.
Well today he’s going to talk about access cavity refinement and working length. But before we get to that, why don’t you do the usual and tell us how you met him and how it is that we have the opportunity to show this presentation today.
I’m smiling because I don’t even hardly know where to start. I first met Arnaldo that I recall physically in Florence in 1989. He invited me over to give a congress, and I was thinking why would anybody come and see a congress by Ruddle; I’d never been to Italy before. But then I remembered all the work he had done, and that Schilder had been before him. They had a drum roll for predictably successful endodontics. So Arnaldo said he invited me because he had seen me lecture in many venues around the world, literally, so we probably saw each other, but I just didn’t know him.
But to the current Arnaldo, he might not know a few things. He loves cactus. My daughter was there for a summer in Florence and she has more stories. But that’s my story, cactus. He apparently likes cats; I think he’s called The Cat Man in Italy. You’ll see this beautiful cat.
Probably seriously though, the courses he’s given in all corners of the world. Big crowds, people want to hear him. He’s a very good clinician so his dentals are exquisite, you might see him working through a microscope somewhere. And he has many books in many languages, so Arnaldo, you’re the best. As you always said, you’re a one-man band.
Okay, so you say a one-man band. But we all know that usually there are people in our lives that help us, and maybe they don’t get all the credit. So is it really a one-man band?
Well he was a one-man band when he was single. But now he has beautiful Sandra in his life, and I think if you go to the airport ,you’ll see that she’s going right along with him on most of his flights. And I daresay she is probably a central part to him being able to travel so much.
And you didn’t answer me about how it is that we have the opportunity. Like how did it come about that you actually asked Arnaldo to be on The Ruddle Show?
Well he was always on my short list, but a lot of guests intervened and came into the show over the 100 shows that we did. But a few weeks ago I was looking at the AAE Discussion Forum, and there was Castellucci; I couldn’t even believe it. And he had a problem that somebody was using bone graft material, so I thought you know, I should have Arnaldo on. So that led to this.
Okay, well just to tell you a little bit more about Dr. Castellucci professionally. He got his medical degree in Italy and specialized in dentistry. Then between 1978 and 1980 he studied at Boston University, he studied endodontics. And he is a professor at several Italian universities and past president of the Italian Endodontic Society. He has lectured in more than 70 countries, published over 60 articles in endodontic journals, and also contributed chapters to several procedures endodontic textbooks. And he is the author of his own books, Endodontics and Microsurgical Endodontics, both of which are published in multiple languages.
So this is just some of the stuff about Dr. Castellucci. We’ll have his bio in our show notes if you want to learn more, because there is more and this is just what I’m saying right now.
And there is so much more.
Yes. So anyway, now let’s get to the presentation. We’re very honored to have the opportunity to show it to you.
[Castellucci Presentation Begins]
Hi everybody, this is Dr. Arnaldo Castellucci, an endodontist from Florence, Italy, with a practice limited to endodontics exactly 45 years ago. First of all I want to thank my very good friends, Cliff and Phyllis Ruddle, for inviting me to be a guest speaker at The Ruddle Show.
The first topic I want to share with you are the new ultrasonic tips designed for finishing the access cavity. Their name is A-C Tips, manufactured by Woodpecker, the Chinese company. Our tips are very long-lasting, very reliable, and I use them every single day.
The other topic I want to discuss with you is the new third generation of apex locators. The Apex is the name, still manufactured by the Chinese company Woodpecker, which works both as an apex locator and the electric pulp tester. Very reliable, very easy to read, and I use it every single day so I strongly recommend it for you.
The new topic I want to share with you is about the new ultrasonic tips, the A-C Tips, specifically designed for finishing the access cavity and manufactured by the Chinese company, Woodpecker. It’s a total of five ultrasonic tips, can be available with EMS and satellite attachments.
What do we expect from ultrasonic tips? One tip, one application. They should be efficient, they should be resistant to breakage – I never, ever broke one of them. They should be very easy to use, long-lasting, and not too expensive.
This is the AC-Tip #1, designed for finishing the access cavity wall. As you can see in this image, the tips are in stainless steel, but they don’t have any diamond coating. What makes these tips very efficient are the microblades that are present along their working length. The #1 doesn’t have any blades at the tip; the tip is smooth in order to be safely used even touching the floor of the pulp chamber without making any damage.
Of course they can be used dry, but they also – and that is when they are more powerful – but they also have, of course, the water port for irrigation. They can be compared to the Endo-Z and the Batt bur, but the difference is that they don’t work a portion. In the Batt bur, it’s much longer, and even in the Endo-Z it’s pretty long. Here it’s almost not visible, but it’s there. Which means that you can work and touch the floor of the pulp chamber, even in cases where the roof and the floor, because of calcification, are almost in contact.
This is a typical case where I start removing the old composite, and then I use the #3 that will be discussed pretty soon. Very, very efficient, very safe. The dental assistant is blowing air to remove all the debris. The first part of the access cavity was made with a high-speed bur and a diamond bur. But when I arrive close to the floor of the pulp chamber, I see the composite. Then I don’t use high-speed burs in the handpiece, but I use ultrasonic tips. Ultrasonic tips under magnification can give me perfect control of what the tip is doing. As you can see, the tip is working now to be more efficient without any irrigation. Once in a while to remove all the debris from the pulp chamber, and also the debris from the blades of the teeth, I start the irrigation. And I’m still using the #3, the one which is sharp at the tip and very, very efficient.
Now I see the gutta-percha, which means I’m very close to the orifice of the canal. I keep removing the composite, and now look what a big piece of composite is removed. And now basically the floor of the pulp chamber is visible. Irrigation to remove the debris from the pulp chamber and also from the blade. This is done using the #3, trying not to touch the floor.
Then with tip #1, I finish the access cavity wall like this, removing the little particles of the roof of the pulp chamber remaining attached to the access cavity wall. As you see, I’m working dry to be more efficient; but you can see any burning of the dentin. The use of the tip is very delicate; it’s like brushing the dentin without pushing, without forcing the instrument against the dentin.
Then with the #3, if you want, you can start the retreatment. And still without any irrigation, when you develop heat, you soften the gutta-percha and you can start removing the gutta-percha from the orifice of the canal.
Let’s see now the use of the second A-C Tip, the #2. The #2 is specifically designed to facilitate how to find the MB1 orifice. It’s similar to the #1, but it has the blades also at the round tip. In order to work with the tip very safely, because it’s not sharp and not aggressive, to remove the dentin which is hiding the orifice of the mesial/buccal canal. And this is the MB1 already cleaned and shaped. So this is the tip #2. It has the same blades on the working part, but the blades are also at the tip. Because this tip works both with the tip and with the sides. This is tip #2, to make it much easier to find the orifice of the MB1 and MB2 canals.
As we know from this interesting article from John Stropko, 1999, the MB2 canal is there in more than 90-93% in the first molar and 60% in second molar. And the best thing to do in order to be able to find the MB2 canal is to believe in their existence. If you believe the MB2 is there, then you can find it. And here it is. And here are some pictures, radiographs where you can see that sometimes they join together.
But some other times they have formed completely independent, and if you miss the MB2, of course then you have a failure. It happens sometimes that the MB2 canal can be negotiated only for a few millimeters, like this. And people think I can’t go any deeper because probably the canal is calcified. This is not the right answer. The canal cannot be negotiable and then become calcified. It is exactly the opposite. The calcification progressed in a coronal to apical direction, so you can find the pulp chamber and the orifice completely calcified; but then the canal is negotiable for the entire length. In this drawing, you see in grey the mesial wall of the access cavity, which is protruding and hiding the orifice of the MB2 canal. And this is the reason why you can’t go any deeper after 2 or maybe 3mm.
So the tip #2 is used both with the teeth to open the groove that goes in a parallel direction, and also with the sides to remove the grey part of the drawing, which is the protrusion of dentin towards the pulp chamber in order to facilitate the negotiation of the mesial/buccal MB1 and MB2 canals. And these are the MB1 and MB2 after being cleaned and shaped, ready for obturation. Of course, be prepared for all kinds of variations in the anatomy, because we can have MB1, MB2, MB3. MB1, MB2, MB3, 1,2,3; and the 2 and 3 were joining together so you only see MB 1 and MB2 in the radiograph.
Let’s see now the tip; the tip #2. Of course it can be used dry or with irrigation like all the others. And this is a typical example where now the tip #2 is working with the teeth, having the blades also at the tip in order to open the groove that goes in a parallel direction which is containing the orifice of the MB2 canal. As you see, it is also working on the side to remove the protrusion of dentin in order to have a straight-line access to the apical one-third of the MB2 canal. Irrigation to remove the debris and to clean the blades of the ultrasonic tool, and now the MB2 canal can be easily negotiated. This is the macro; open it and here is the 08 ready to negotiate the MB2 canal.
Let’s see now the tip #3. This is the only one which has a sharp tip and is quite aggressive, and has specific indications: to remove calcification, and to remove carbon fiber posts. These are the blades, along their length the sharp teeth. And because these teeth after several uses are not sharp anymore, then even though the tip is designed to have five different tips which each one of them has its own indication, in the case you will find six tips. Because I put two of the #3, which is the one which has to be replaced more often because the tip becomes smooth after removal of many calcifications, composites, amalgam, and the carbon fiber post.
Of course this also has the water port to be used under irrigation. This is the tip, and this is a typical use for the removal of carbon fiber posts. Carbon fiber posts need to be removed and disintegrated with an ultrasonic tip, not with a rotating instrument. Because then you don’t have any control of where the tip is working and it’s very easy to make a perforation. With the ultrasonic tip, the visibility is excellent, and the carbon fiber post was straight and then it is positioned in the third portion of the canal. So as long as we see a black, round material, we keep working, and the third portion of the canal can be also so deep to arrive almost to the foramen.
But very, very safely we work on the carbon fiber post without touching the dentin. We work dry; once in a while we open the irrigation to remove all the debris. And when we don’t see any more black material, only some little black and white in the composite, the carbon fiber post has been removed.
And here we can see exactly the same. The carbon fiber post here was pretty long. And here the ultrasonic tip #3, the A-C Tip #3 is working with the tip, disintegrating literally the carbon fiber post.
Let’s keep working. I repeat the concept; the carbon fiber post was straight and positioned in the straight portion of the canal. So keep working until you see some obturated material like gutta-percha, which means that the carbon fiber post has been completely removed. And now we can initiate and start out non-surgical retreatment.
The tip #4 actually is not designed to finish the access cavity, but has been designed to easily remove metal and mainly screw posts from the root canal. This particular shape where it is flat here but is very aggressive if you work on the side of a screw post with this maximum diameter. It has an elliptical shape, can also be used dry, but has a water port for irrigation. Here is the tip and here is the use.
The best thing to do to remove the composite around a screw post, again is the use of an ultrasonic tip. Maybe it will take more time. Maybe if we use a high-speed bur, the removal of the composite can be faster. But if we touch the screw post with a high-speed bur, we can make it thinner and thinner until it maybe breaks.
On the other hand, if we touch the screw post with the ultrasonic tip, we transmit vibration and this will help its removal. We try to remove all the composite around until we have enough space to accommodate the tip #4. So right now I am using the tip #3 only to remove the composite and make room around the screw post to the tip #4. When I remove enough composite and can accommodate the #4, then I use the #4 on the side to transmit vibration, and also now on top of the screw post going clockwise and counterclockwise. And you will notice that in a few seconds the screw post will start moving, unscrewing; and in 15-20 seconds the screw post will literally jump out of the canal, and now the retreatment can be continued.
And now let’s see the very last ultrasonic tip, the #5, which has been designed specifically for finishing the floor of the pulp chamber. It can be used dry or with irrigation having the water port, and this is typical case. This is a young patient who came to the office with inner pulpitis, and has the typical cracked tooth syndrome. As you see here, the roof of the pulp changer is here and this looks like they floor. But this is not the floor; this is a big calcification because the natural floor is down here. This is the roof and this is not the floor; this is a big calcification on top of the floor. That calcification has to be removed.
This is the part hole involved with the crack, and this is the reason why the patient had symptoms. And now with the tip #5, working on top of the calcification on the floor, little by little remove pieces after pieces of the big calcification which is on the floor of the pulp chamber. This is done even before negotiating the root canal, in order to prevent big pieces of the calcification from falling down and blocking the canal. As you will see soon, look at these big pieces falling in the canal and blocking it. So I keep working with the tip, which is not flat at the end, but is concave in order to find and show the natural convexity of the floor of the pulp chamber. Irrigation, and here we are.
Now with tip #1, when I am happy with the removal of the calcification, I use the tip #1 in order to finish the walls of the access cavity; remove the interferences in order to have straight-line access to the apical one-third. And this is still done before negotiating and removing the pulp tissue from the root canal.
After the removal of the calcific material, now we are ready for cleaning and shaping. And this is after cleaning and shaping the canal. And look at the convexity of the floor, how it is visible.
So this is my immediate post-op. And if I superimpose the pre-op, you see again. This is the roof, this is not the floor; this is the calcification on top of the floor which is down there. It is down here. And this is thanks to the use of the concavity of the tip #5, specifically designed to find out the original convexity of the floor of the upper and lower molars.
The second topic I want to share with you is the use of the third generation of apex locator, better called foramen locators. Because all the apex locators in the market, they don’t tell you where is the constriction, but they tell you where is the end of the canal, and the end of the canal is the foramen. That’s why they should be called foramen locators and our instrumentation and obturation should terminate at the electronic apex; which means the end of the canal, the foramen.
The third generation of apex locator has been patented by Carlos Alberto Spironelli Ramos, a teacher in several universities in the United States, and the patent was applied in the year 2005.
We know that dentin is one of the best thermal and electric isolators in Mother Nature. This is so true that if we could build a house with dentin, that house wouldn’t need any air conditioning in the summertime or any heater in the wintertime because of the perfect isolation. In the apical one-third, the property of isolation is decreasing. And now because of the thin thickness of dentin, the electronic current can easily pass through. When we introduce the instrument inside the root canal, the apex locator is not telling you anything until you are in the apical one-third where the thickness of dentin becomes thinner and thinner.
The output signal will go and stop at the tip of the file. The electron will accumulate, accumulate, until there is a “spark” and goes through dentin and then very fast through bone and gingiva to the lip clip. And now the input signal goes back to the apex locator, a little bit smaller because some of the electrons were blocked by the dentin which is an insulator. This is the way and apex locator works.
So this is the output signal. The electrons accumulate at the tip of the instrument, accumulate, accumulate more and more until there is a “spark.” So the input signal will go back to the unit but still telling you that you are closer, but still pretty far away from the end of the canal, there.
If I move the tip of the file to a point where the dentin is a little bit thinner, I will have less impedance; therefore the output signal will be bigger than before. In other words, the closer we get to the foramen, the thinner is the dentin. Then we have a more and more precise and accurate readings. The closer I am to the foramen, the more the input signal and the output signal will be almost the same, but still not accurate. And this is what happens. We are almost at the foramen, but still not exactly there.
Very accurate will be when the tip of the file will be at the foramen equator. There will be no more dentin around the tip of the file, and as a consequence there will be a big drop of impedance there. This is where the apex locator is more accurate and the reading is 0.0.
This is what happens. Accumulate, accumulate, spark; the input signal goes back to the instrument and reaches the 0.0 reading, which in this drawing is red, but in the real instrument is yellow. When you see the red color, you are already through the foramen. So you have to adjust the working length.
So the instrument, I repeat, is not telling you the ways, the constriction, because it’s based on this very simple principle. It’s influenced by the thickness of dentin and it tells you the point where there is no more thickness of dentin because we are at the equator of the foramen. We are at the foramen. Then if someone wants to stay short, shorter, and to measure on the scale, half a millimeter, one millimeter, whatever. But remember that this number on the side of the apex locator, any apex locator, they are not fractions of millimeters. So this is not .5 or .25. If you want to stay half a millimeter short you have measure on this scale. And this is the instrument, and this is when you are at the foramen. Now you are through the foramen; then you have to adjust your working length.
This is the Woodpecker apex locator; the accurate reading is at 0.0 when the tip of the file is at the foramen equator. The Woodpecker apex locator is incorporated also in the Woodpecker model, which is the end or other probe. The accurate reading is, again, at 0.0 when the tip of the file is at the foramen equator. Like this. Now you are at exactly the foramen.
I repeat, if you want to stay shorter, you have to measure on the scale. Don’t trust the number you see next to the apex locator.
This is how the apex locators work. Do you think they can locate the apical constriction? Absolutely no! I wish to remind you that this third generation of apex locator, the Ai-Pex, works not only as an apex locator, but also as an electric pulp tester. Very reliable and I use it every single day.
And then I want to say one more time, thanks to my very good friends, Cliff and Phyllis Ruddle, for inviting me as a guest speaker at The Ruddle Show. This is my website; you see here my email address in case you need to ask some questions or want to know any information. Please don’t be shy; send me an email and I will answer to you as soon as possible.
This is my textbook on Microsurgical Endodontics, which is available not only in Italian but also in English, French, Spanish, Chinese, Macedonian, Turkish, and maybe some other language. And this is the other textbook on endodontics, the very last edition, also available in Italian, English, Turkish, Russian, Macedonian, and pretty soon also in Chinese.
So thank you for your kind attention, and if you have any questions don’t hesitate to contact me. Thanks to all of you and bye-bye.
Okay, so that was a great presentation. There were a couple things that I wanted to mention. First, Dr. Castellucci is an excellent clinician. Even a layperson such as myself was impressed by the beautifully flowing, tapered shapes on the radiographs.
And then the second thing I noticed was that he uses very different technology than what you use, but his final shapes are very similar to the ones I see that you do. So that got me to thinking that there’s just many ways to get from point A to point B.
There’s many ways to get to Rome?
So if you think of a driving analogy and you’re trying get to a destination, you can go in many different kinds of cars. Some are more comfortable, some maybe are faster, some are more fuel efficient, but you still get there. So I guess for me, what I’m trying to say is maybe the keys to success in endodontics, at least for me, seem more dependent on the skill of the clinician than what technology is used. That’s just my opinion, but what did you think about the presentation?
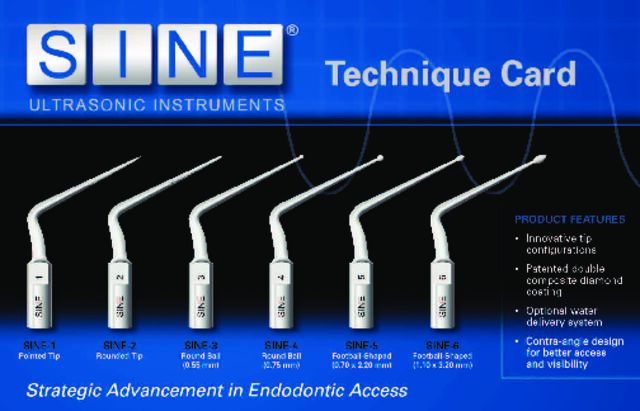
Well thank you Arnaldo, it was a great presentation. And the reason it resonated with me is when I asked him to do this topic, I had no idea that he had developed these A-C, Arnaldo Castellucci tips, through Woodpecker. So I had no knowledge of that. Because about 20 years earlier we had developed ultrasonic instruments, and so subsequent iterations included this, the SINE tips. That stood for Sophia, Isaac, Noah, and Eva. But then there was a fifth grandkid named Luca. So all of a sudden we didn’t know whether they would be called L-SINE or SINE-L, but anyway, that was an inside thing. SINE because when you energize the tip there’s a sinusoidal wave that goes through the tip mathematically, and so that’s what makes it active and it vibrates.
But back to Arnaldo, I really liked his topic. It surprised me because I didn’t ask him what to lecture about and I didn’t say any parameters; no guard rails, whatever you want to talk about. So it resonated because I’ve always thought the access was critical and essential for all subsequent steps. In fact, if you don’t even find all the orifices, how good is that?
So I always thought colleagues needed to have a tool other than a handpiece with a big, bulky head and burs. I thought they should have something that removes that, and let them really get in there and have axial walls that are flared, flattened and finished; and I call that the three F’s.
Okay, I know you told me too that you were interested that one of his tips had a disc design that was not on the SINE tips, and so you said that you were intrigued by that.
Yes, his A-C 4 is an instrument with a tapered design, and at the end is a disc; like a disc that you’d throw in the Olympics. And our post removal tip was a ball. So I want to know – if Arnaldo you’re on camera right now, I’m talking to you – maybe you could send me a set of your tips. I’d like to compare the disc with the ball. But the disc seems like it might have a little more energy in my experience of building tips.
Okay. Dr. Castellucci said that his tips were stainless steel and not coated like the SINE tips. So can you comment on that?
Yeah. We the first ones – and when I say “we,” the engineers and Ruddle were the first ones in the world to make an ultrasonic tip that was active. They were all active, but they were smooth, tapered, and they were stainless steel. By more active, more efficiency, I’m talking about coatings.
So we used different coatings, zirconium nitride was one coating. Then on these SINE tips, it was double diamond composite coating, that was the first in the world. And what Arnaldo did is he got rid of all the coatings and he went with a microblade design. So along the active portion there are vertical striations, blades, flutes, and they’re called on Woodpecker microblades, and that’s how he get his activity. So there’s no coating; he goes with microblades and we went with a coating.
Another thing that I found pretty interesting about the presentation was that Dr. Castellucci didn’t know about the SINE tips, and you did know about his A-C tips. But both of you saw the need to refine the access cavity. So why is it so important to have a nicely finished access cavity?
You reminded me before this segue that we were going to be having a podcast going on a deeper dive, right? So this will tease them so they’ll come over to RUDDLE+ and see more comments.
But anyway, when you have a finished access – remember, flared, flattened and finished are your axial walls – light refracts off those smooth, flat walls, and you see better. So one thing is better vision.
The other thing is we slide instruments down smooth axial walls into preflared orifices. This makes all subsequent steps easier, like putting shaping files in, your irrigating devices, obturation; all the subsequent steps are improved when the colleague has the great first step, and that’s access.
I have another question for you. I know that he mentioned that his tips have a water port, and I know that the SINE tips also had a water port. However, I never saw you use the water port, and I also did not see Dr. Castellucci using the water port when he was doing the active work. So I was wondering, why do you have a water port and did you ever use the water port?
Oh wow, that’s a good one. Did you hear the key word she said, because most of you missed it. She said “active.” She said when he was doing his active work; I think you missed it, didn’t you? Because you would go back and say you know, Lisette didn’t get it right. He used it on every single case; I saw water everywhere. It was when he was all done doing his ultrasonic work. He didn’t want water because water combines with dentin, and dentin byproduct is dust, and dust and water make mud, and you have no visibility. So he did all of his work, Ruddle did all of his work, and when he was done he used his water port technology to flush out the field.
What I always did, I never used the water ports. In my office the valve is closed; it’s blocked. I did it why? Because when you’re manufacturing tips, corporate said many colleagues, they write and they say don’t forget the water port. We would buy them if they had a water port. I said if you want to put a water port in, put a water port in; I don’t need it. What I need is a great chairside assistant. She has high-speed vacuum in one hand, and she has the triplex syringe with the attachment, Stropko Irrigator, rotary locked threads, psst, psst, psst, and she blasts it out and I saw perfect.
Okay. I did also really like the second part of the presentation when he talked about apex locators. Because for me, I understand what they do; but I didn’t really know how they worked exactly. So I thought that was very informative. And then I also learned that dentin is the best thermal insulator in nature.
One of the best. Electrical and thermal. A comment or two on that. Most of you put the lip clip in, and then you’ll attach the little prong on the shaft of your file, or the top of the handpiece, and you’ll just walk it right on in. That’s great, but wasn’t it great how he explained how the electrons are flowing down the instrument, and they begin to accumulate. And when they build up a critical mass they discharge and they get through that thin dentin. Because as you go apical, the walls are thinner and thinner and thinner, so there’s less distance to go from inside to outside. So then it can go through the bone, it can go through the overlying tissue and right back into the machine, and you get your impedances almost – there is no difference, so you’re at 0.0. That’s called the apex.
So really, as he pointed out, we should tell the colleagues; I always work to 0.0, but remember when the file leaves the root, there’s no dentin around it, so that’s a loss of impedance. You’re a little bit through. So he mentions maybe backing your working length off maybe one-half to one millimeter. It depends on the case, but you’ll work a little shorter than that probably with your shaping files. Your patency files, remember, to the foramen and minutely through.
Okay. Is there anything else you want to add?
I think I might have made a note about that, anything else I wanted to add.
I think you wanted to say something about the fiber post.
Oh yeah. Arnaldo took out a fiber post with his tip. I remember doing it in the day; I did it with – the Pro-Ultras had that capability. The SINE tips were made for access chambers, not really sub-orifice instruments. So it would be the Pro-Ultra, we had that tip.
I just found that it was not very efficient, and I would like to see the durability of his tips. They might be more durable than the Pro-Ultras – sorry Dentsply Sirona – because maybe Woodpecker has more durable. But I’m thinking he keeps mentioning how durable they are. You can break a tip, and they’re about a $90 event. So people don’t like it when they break their tips. But he showed that whole removal and it was quite nice, but I have -
You mean disintegrating the post?
Yeah, just to get the post out. The post is a composite with fiber, and so they’re quite hard, they’re quite formidable. And it takes some time and you’ve got to be patient. And you probably better have a microscope. Because as you go down deeper and deeper and you’re trying to get out a fiber post, which is the most frequently used post today in the world – because we’re going away from metal for esthetics, and we’re going to the fiber posts because they can match the Burnell Hardness Number of dentin with the fiber post – so it moves and behaves physically like bone moves. When you eat and chew, you mandible is flexing, your roots are flexing a little bit, and the post can flex with the roots.
So he did remove it with his #3, his A-C3 – it’s a pointed tip. He actually has six instruments with the kit. He gives you two pointed ones because he said they break. They can break. Or maybe he didn’t say break, they dull and the tip gets off. But I would just say to you, go to you lab and put a new point on it. You can sharpen it and re-resurrect that “dull” tip.
Okay, well I think at the close of the show in a moment you’re going to show us another way to remove a fiber post.
There’s another way. As you said, there’s many different ways to get from A to B. And since I’m talking about an Italian, and since there’s an expression in America: there’s different roads and they all lead to Rome.
I liked her earlier comment. It’s the thinking; it’s not the tool. Everybody buys tools, right? So it’s the thinking and knowing when to use the tool, when to employ it, how will it help you. That’s the critical thinking that I like about Arnaldo, and Pierre, and John West, and Schilder. Can I stop?
Yes, because you’re going to need to name everybody you know.
That would be a problem. I’d forget most of my friends.
All right. Well thank you again to Dr. Castellucci for that presentation. I guess we’ll look forward to – I know he’s really busy, so we really appreciate it. And we look forward to seeing what you’re going to show too, coming up.
Thanks Arnaldo, and we’ll have you back. Next time maybe you can tell us about your adventures in Indonesia.
It’s good to be with you, and I’m at the board to show you a little follow-up to the lecture we just saw by my friend, Dr. Arnaldo Castellucci. Now Arnaldo has a great mind. He’s an inventor and he showed with his A-C 3 I believe how to remove a fiber post.
I showed how to remove this fiber post in I believe it was October, 2021. So it was some years ago. But I just also had a German group here last week, and two Austrians. So we had a really great group. And when they want to know how do you get out a fiber post? Because we’re using ultrasonics and we don’t like it. It’s slow, it’s inefficient, we break tips.
So I said ahh; you don’t know about the – I’m going to show you some technology. So I revealed this to them as well. So I want to come back to it again, because it’s meritorious, because it’s efficient, and it’s a very profoundly successful way to get posts out quickly.
So you can see that fiber posts are in a lot of these teeth. You are seeing them almost daily when patients come in for their appointments. They’ve been placed a lot because we are getting away from the metal posts. There might be some indications for metal posts, but basically we’ve gone to fiber posts because fiber posts are a composite with the fiber, and they’re very strong. In fact chemists, formulation people, they can match the Burnell Hardness Number of dentin in the post so it behaves much like dentin. Less fractures.
They also are good for esthetics, so we have a better esthetic result when we use fiber posts. So because we’re seeing more and more of them, some of them are going to have to come out in the retreatment situation.
So you can see here, some of this is the midline suture so that’s normal. But much of this is pathology. This would be called, as you know so well, a lesion of endodontic origin. So let’s look at another way besides ultrasonics. Unicore Drills; that’s from a Utah company. Dan Fisher has got a company up there called Ultradent, and that’s where these are made.
I found out about these many, many years ago. And I liked them because immediately I noticed they have a special tip. And the tip has a patented – well it’s a heat technology, listen to that – on the end of a tip to collect a little bit of heat. Because the byproduct of heat destroys the composite fiber, and it allows the drill then to advance through a softened material so it can stay more on center and remove the post. So it doesn’t drift off into dentin, get ledges and perfs.
So that’s a technology I wanted to bring to your attention. It also is a tip that’s a little asymmetric. When you spin it in the air, it’s not going like the prop of a plane with a central axis; it kind of has a cam in it. Well that also is part of the technology in that patent.
So it has special blades up on the top, it has a diamond up even higher that’s off the screen. But what you want to do is always start sequentially; always start at the small one. Wait a minute. The small one is an 06. We don’t use it, it’s too small, it’ll break. So we start actually – so there’s a size zero so you’re not fooled – but we start with size 1. And they’re iso-colored, so it’s yellow, red, blue, green. And it’s .8, 1mm, 1.2mm, and on the back it’s 1.4mm. So that’s their cross-sectional diameter.
So we don’t start with – look in the mirror, say okay, we’ve got about that big, I guess I’ll grab this one right here. No, you don’t do that. You make a small pilot hole with this, then each subsequent drill has a pilot hole to follow.
Maybe out in the audience while you’re watching, could you just amuse me and say “follow.” We’re going to follow.
All right. So very quickly we can come in here and get that ball off there. Once that ball is off there I like to use Methylene blue or Chinese red – it’s just a vegetable, water soluble dye – and I can kind of map the post relative to the dentin. If I pause this for a second, oftentimes the color of the post is almost exactly the color of dentin, and now visually it’s hard to know when is the post out versus when am I taking dentin. Precious, cervical, and circumferential dentin.
So a little dye sometimes can seep into an interface and stain a little bit. But the thing I’m showing now is you can come in here with a #2 round bur, you can come in with the end of a diamond, you can use an ultrasonic instrument. And we’re just going to make a little divot; we’re going to make a little divot to prepare that tip. That patented technology tip so it can follow.
Okay so here we go. So there’s a lot of ways to do it, as I just mentioned. But the main thing is to make a little pilot so you don’t use a drill and it starts to skate around and skate off the top of the platform. So once you have that, flush the field. The assistants are always right here with the high-speed suction, and the triplex syringe with the Stropko Irrigator attached. And there’s that patented tip, the asymmetric tip, the heat collecting tip, and we’re going to start.
Now as you watch this carefully, you’re going to notice we drift. And that might scare you so that’s why I’m showing you. I’m going to be drifting a little bit this way. But through the microscope – and you can take the drill out, you can have your assistant clear the field so you have good vision – you’ll see that your still inside. Because the hardness of the tip is a little less than dentin. And because of the heat technology, it’ll soften and make you continue the pilot hole process, albeit deeper.
So here we are with the next one. You can see it has an easier time. You should be up there around 15-20 thousand RPMs. You want a great, high torque motor to drive these instruments. And as you work on down, sometimes you have the impression after you’ve cleared it out that everything is going quite well. In fact you can even see here – when she gives me a little air blast you’ll see some delamination. And you’ll notice that that delamination means we’re loosening and we’re getting to the very maximum diameter or equator of the hole at that level.
So here we are, look at that. We’re right up to that diamond. Out we come, flutes are loaded and we begin to look down there. And if we rack focus we can get right down to where a drill gouged into the gutta-percha a little bit, and you can see that little indentation.
So to me, I didn’t keep track of the time. But if you try doing that with ultrasonics versus the Unicore Drill, you’re going to have a completely different result, and it’s going to be quick.
But we still have to get gutta-percha out; we’ve talked about that on many, many shows, the removal of fillers. We’ve talked about cone fit, haven’t we? So we’re going to fit a system-based master cone – thank you Nathan Lee – and it’s going to match our corresponding file. In this case I was probably using manual back in that day. But notice the rate of taper of the cone is less than the rate of taper of the canal. That means I have great apical tug back. And now we can bring in the Schilder Technique – we’ve shown that in other shows. Listen, you’re all getting pretty smart out there. I can tell your questions are getting better, because the more you watch the shows – many of you have gone on to RUDDLE+, and that’s pretty cool because we do some deeper dives.
So downpack, heat, pack, heat, pack. And in about two or three heat compaction cycles we are into the apical one-third and out with the lateral anatomy. So we get the lateral anatomy dominantly on the downpack. And then of course we can backpack, or if dentistry requires and wants a post space, I have a pretty available post space.
Let’s not ever alter a well-shaped canal with a stock drill out of a box so we can place another post. This is not endodontics. This is not conservative dentistry. This is not minimally invasive. So let’s make the post – let’s choose the post, let’s select the post that fits in that space.
You might want to squirt some gutta-percha and be here. Usually you don’t need to go. About one part of post would be the part that would be above the bone, above the bone. About one part above the bone, one part below bone, about one-to-one, maybe 1.3, but there’s no need of putting posts up into the apical one-third on virtually all teeth.
So that’s the downpack, and now you’re excited to see the backpack. This tooth doesn’t need a post in the first place. Look at all the tooth structure. We can get the ferule effect, we can have the biological width, and we can have a great esthetic result.
So there we are. You can see, out with the lateral canals, you can see the lesion post-op, and here we are later in time and the inevitability of the bone repair after careful and complete, predictably successful endodontics. Thank you very much for watching and I’ll see you on the next show.